在这篇博客中,我们将以一个简单的猫咪主页项目为例,讨论几个关键的前端开发知识点,包括位置设置、图片处理、字体处理、:root变量的使用、8px设计原则,以及如何利用Flex布局进行页面设计。

项目结构

我们创建了一个名为”Catbook”的页面,HTML结构如下:

1
2
3
4
5
6
7
8
9
10
11
12
13
14
15
16
17
18
19
20
21
22
23
24
25
26
27
28
29
<!DOCTYPE html>
<html>
<head>
<title>Catbook</title>
<link rel="stylesheet" href="styles.css" />
</head>
<body>
<nav class="navContainer">
<h1 class="navTitle">Catbook</h1>
</nav>
<div class="appContainer">
<div class="avatarContainer">
<div class="avatar"></div>
</div>
<h1 class="name u-textCenter">Buka Buka</h1>
<hr class="line" />
<div class="u-flex">
<section class="subContainer u-textCenter">
<h4 class="subTitle">About Me</h4>
<p>I am more of a turtle person but I'm just trying to fit in and get a catbook.</p>
</section>
<section class="subContainer u-textCenter">
<h4 class="subTitle">My Favorite Type of Cat</h4>
<p>I actually prefer turtles.</p>
</section>
</div>
</div>
</body>
</html>

CSS样式文件 styles.css 包含了全局变量、组件样式以及实用类。以下是关键知识点的详细解析。

1
2
3
4
5
6
7
8
9
10
11
12
13
14
15
16
17
18
19
20
21
22
23
24
25
26
27
28
29
30
31
32
33
34
35
36
37
38
39
40
41
42
43
44
45
46
47
48
49
50
51
52
53
54
55
56
57
58
59
60
61
62
63
64
65
66
67
68
69
70
71
72
73
74
75
76
77
78
79
80
81
82
83
84
85
86
87
88
89
90
91
92
93
94
95
96
97
98
99
100
101
102
103
104
105
106
107
108
109
110
111
112
113
114
115
116
117
@import url("https://fonts.googleapis.com/css?family=Open+Sans:300,600");

:root {
--primary: #396dff;
--grey: #f7f7f7;
--white: #fff;

--xs: 4px;
--s: 8px;
--m: 16px;
--l: 24px;
}

body {
margin: 0;
font-family: "Open Sans", sans-serif;
}

.u-flex {
display: flex;
}

.u-textCenter {
text-align: center;
}

.navContainer {
padding: var(--s) var(--m);

background-color: var(--primary);
}

.navTitle {
color: var(--white);
font-size: 20px;
/* Below cancels out some of the default styling of h1 */
margin: 0;
font-weight: normal;
}

.appContainer {
/* TODO: Add a max width, padding, and margin so that
* the content on the page isn't larger than 960px and
* this div is centered if the browser is larger tahn 960px.
*/
max-width: 960px;
padding: var(--m) var(--m);
margin: auto;
}

.avatarContainer {
/* padding makes the image only takes up 30% of the container */
padding: 0 35%;
}

.avatar {
/* make it responsive */
max-width: 100%;
width: 100%;
height: auto;
display: block;
/* div height to be the same as width*/
padding-top: 100%;

/* make it a circle */
border-radius: 50%;

/* Add image */
background-image: url("cat.png");

/* Centering on image`s center*/
background-position-y: center;
background-position-x: center;
background-repeat: no-repeat;

/* it makes the clue thing, takes smaller dimension to fill div */
background-size: cover;

/* it is optional, for making this div centered in parent*/
margin: 0 auto;
}

.name {
/* TODO: Change the size and weight of the font so it feels
* important!
*/
font-size: 2.4em;
font-weight: 300;
}

.line {
/* TODO: Change the color of the line so that it's less weighty */
border-color: var(--grey);
}

.subContainer {
flex-grow: 1;
flex-basis: 0;
}

.subContainer + .subContainer {
/* TODO: Hmm, I wonder if this can be used to add spacing between
* subContainers...
* https://developer.mozilla.org/en-US/docs/Web/CSS/Adjacent_sibling_combinator
*/
margin-left: var(--m);
}

.subTitle {
/* TODO: Change the size and weight of the font so it feels
* important! Optionally add some margin.
*/
font-size: 1.5em;
font-weight: 300;
margin: var(--m) var(--s);
}

有一些使用了u-开头,我们称这类只应用一个css属性的类为效用类(utility classese)。


1. 位置设置

内容居中

为了让页面内容居中,我们在 .appContainer 中使用以下样式:

1
2
3
4
5
.appContainer {
max-width: 960px;
padding: var(--m) var(--m);
margin: auto;
}
  • max-width: 960px; 确保页面宽度不会超出960px。
  • margin: auto; 水平居中内容。
  • padding 为内容添加内边距,防止内容紧贴边框。

图片位置调整

为了使头像图片在父容器中居中,我们在 .avatar 中使用了:

1
2
3
.avatar {
margin: 0 auto;
}
  • margin: 0 auto; 将块级元素水平居中。

此外,通过设置 background-position 属性,使背景图片始终居中:

1
background-position: center;

2. 图片处理

响应式设计

头像图片使用以下样式确保在不同设备中保持良好的展示效果:

1
2
3
4
5
6
.avatar {
max-width: 100%;
width: 100%;
height: auto;
padding-top: 100%;
}
  • max-width: 100%; 防止图片超出容器宽度。
  • padding-top: 100%; 通过设置高度与宽度相等,使图片保持正方形。

圆形裁剪

通过 border-radius 属性将图片裁剪成圆形:

1
border-radius: 50%;

3. 字体处理

引入自定义字体

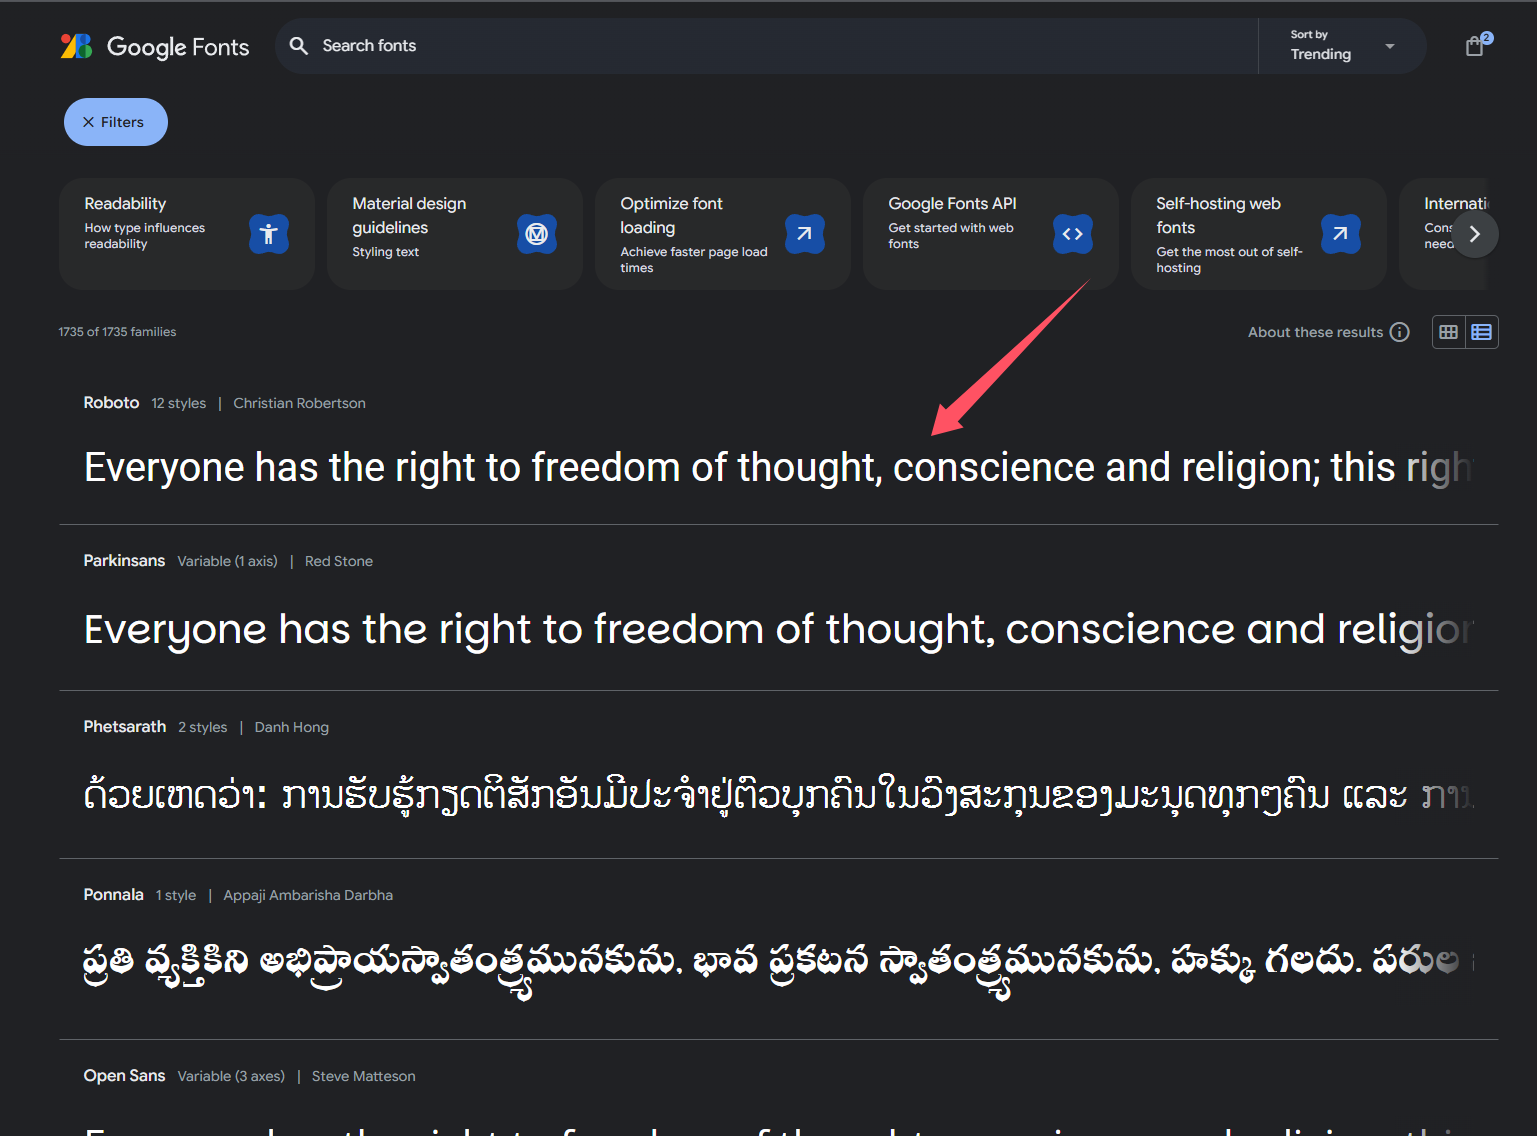
  • image-20241127154020650

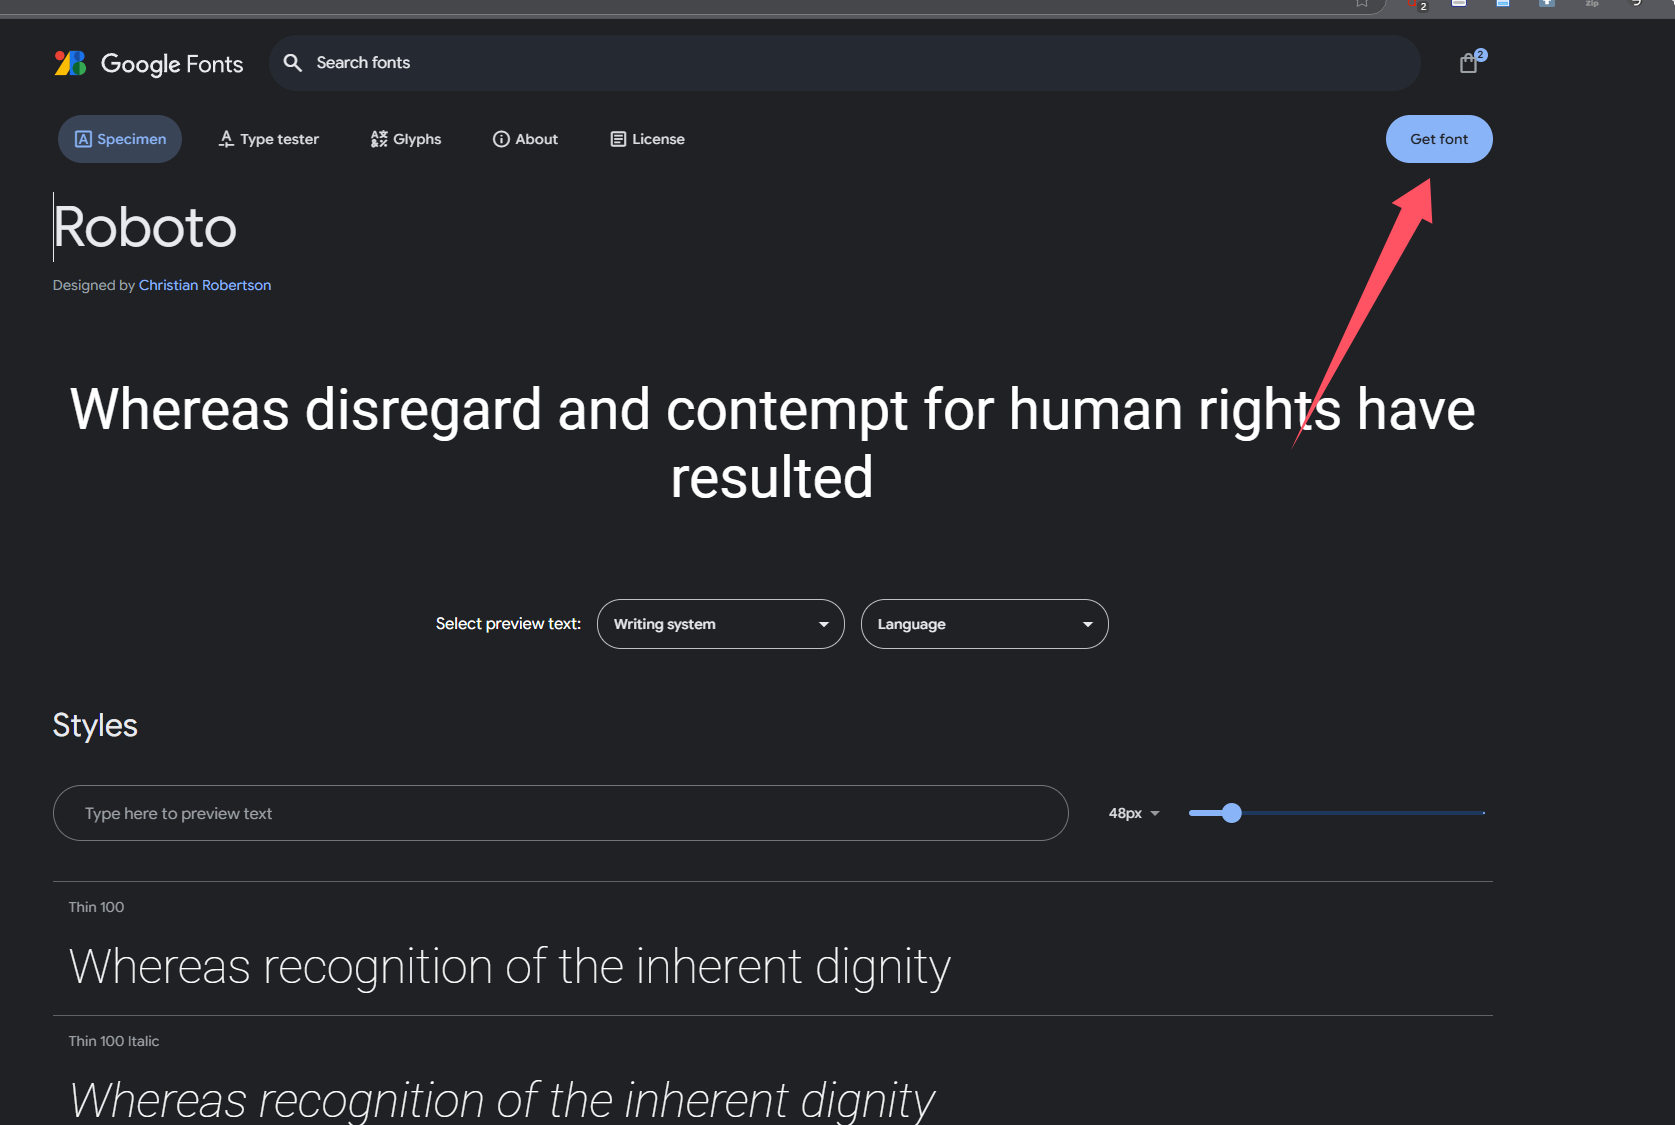
  • image-20241127154053638

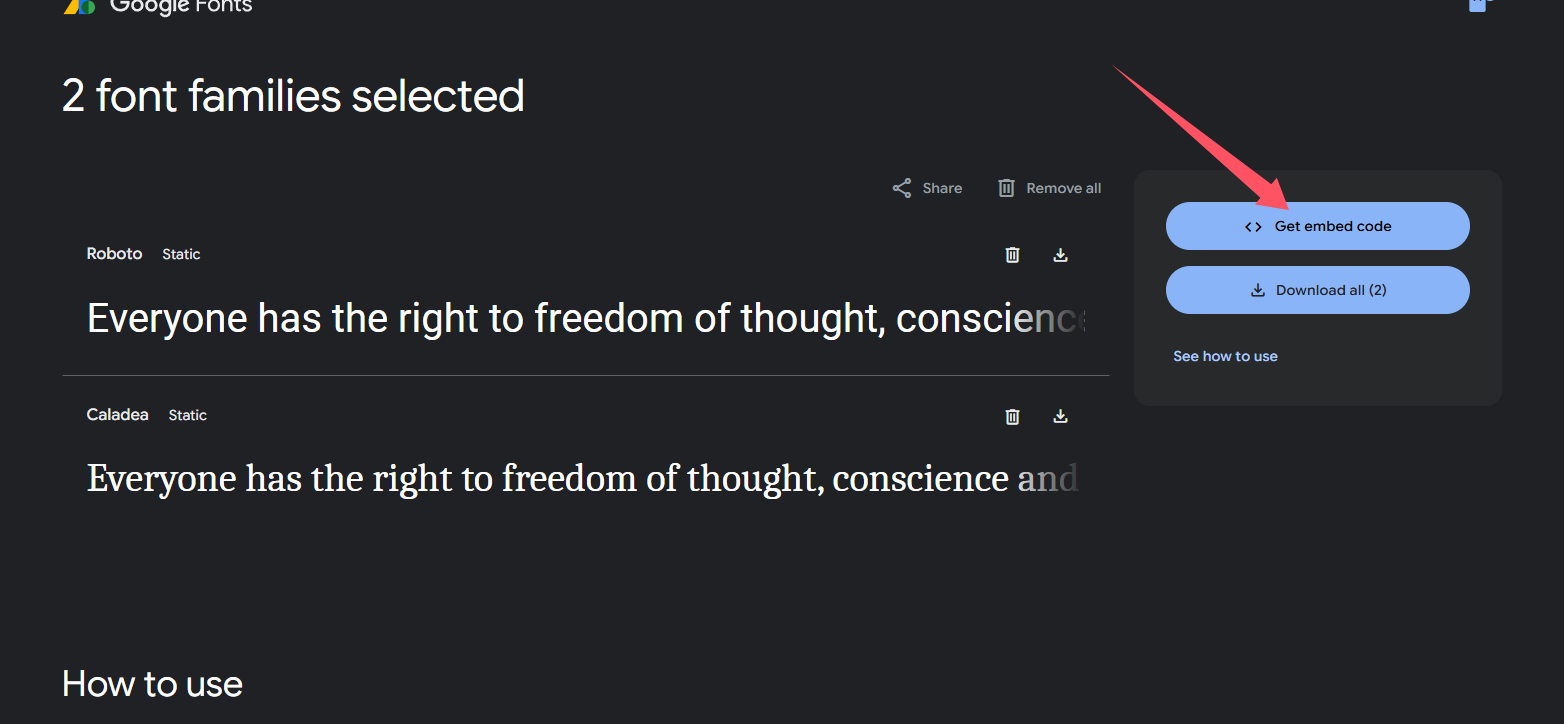
  • image-20241127154106481

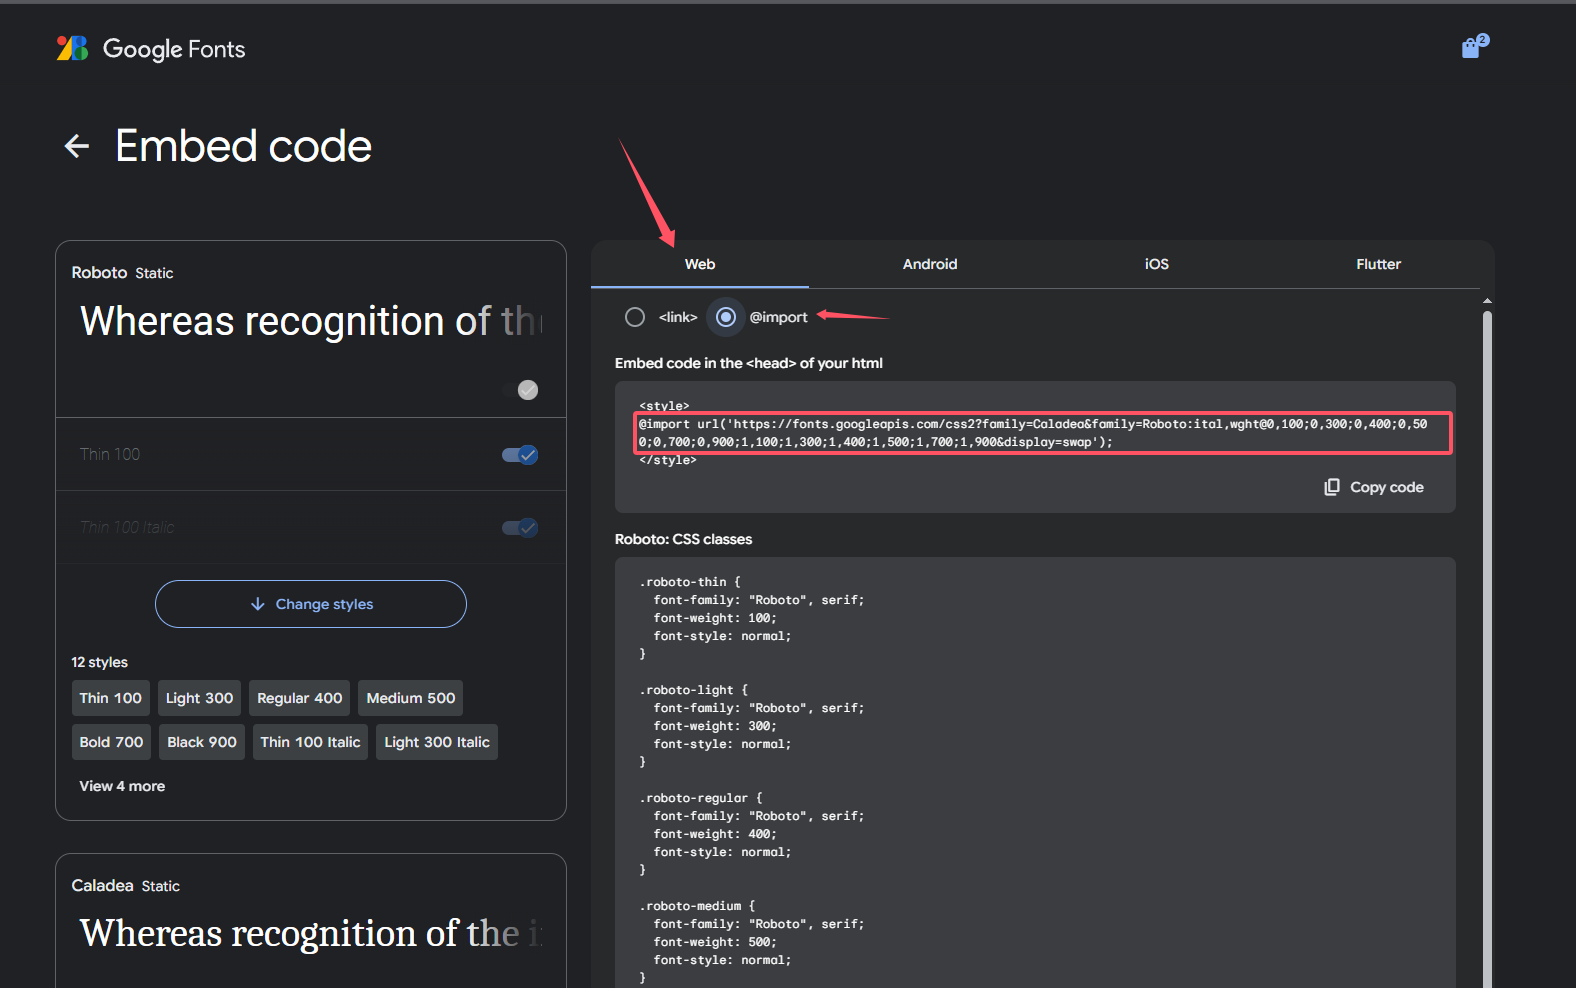
  • image-20241127154200964

使用 @importBrowse Fonts - Google Fonts 引入 “Open Sans” 字体:

1
@import url("https://fonts.googleapis.com/css?family=Open+Sans:300,600");

4. 使用 :root 定义全局变量

:root 提供了一种集中管理颜色、间距等样式的方法:

1
2
3
4
5
6
7
8
9
:root {
--primary: #396dff;
--grey: #f7f7f7;
--white: #fff;
--xs: 4px;
--s: 8px;
--m: 16px;
--l: 24px;
}
  • 定义颜色变量,如 --primary 用于导航栏背景。
  • 定义间距变量,确保布局一致性。

使用这些变量,可以轻松更新整个页面的样式。例如:

1
2
3
4
.navContainer {
padding: var(--s) var(--m);
background-color: var(--primary);
}

5. 遵循8px网格系统

间距与尺寸

CSS中所有的间距和尺寸都使用了 8px 的倍数:

1
2
3
4
--xs: 4px;
--s: 8px;
--m: 16px;
--l: 24px;
  • 4px 用于微调。
  • 8px16px 用于组件的内外边距。

例如:

1
2
3
.subTitle {
margin: var(--m) var(--s);
}

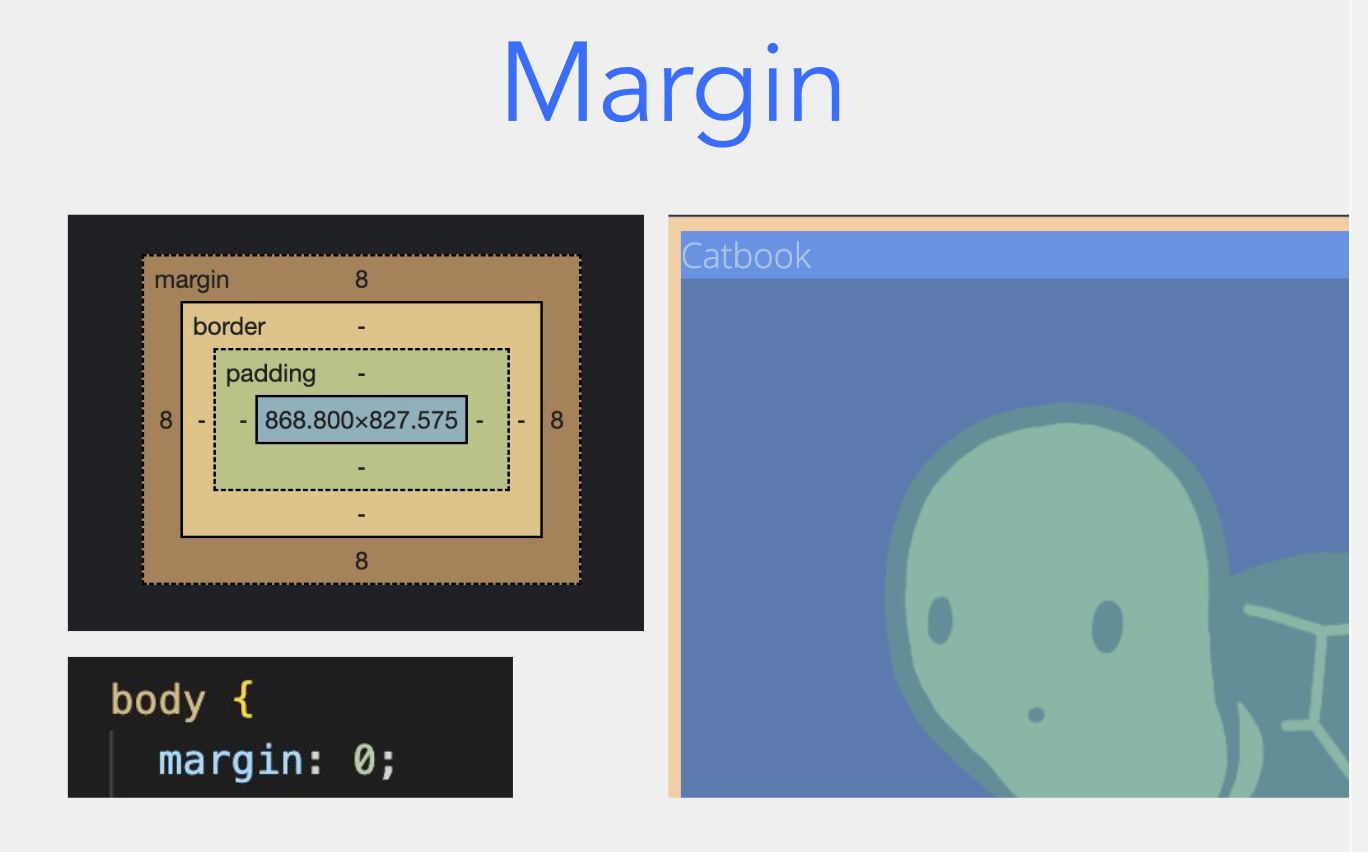
我们可以在浏览器中检查元素来观察margin和padding:

image-20241127154632834

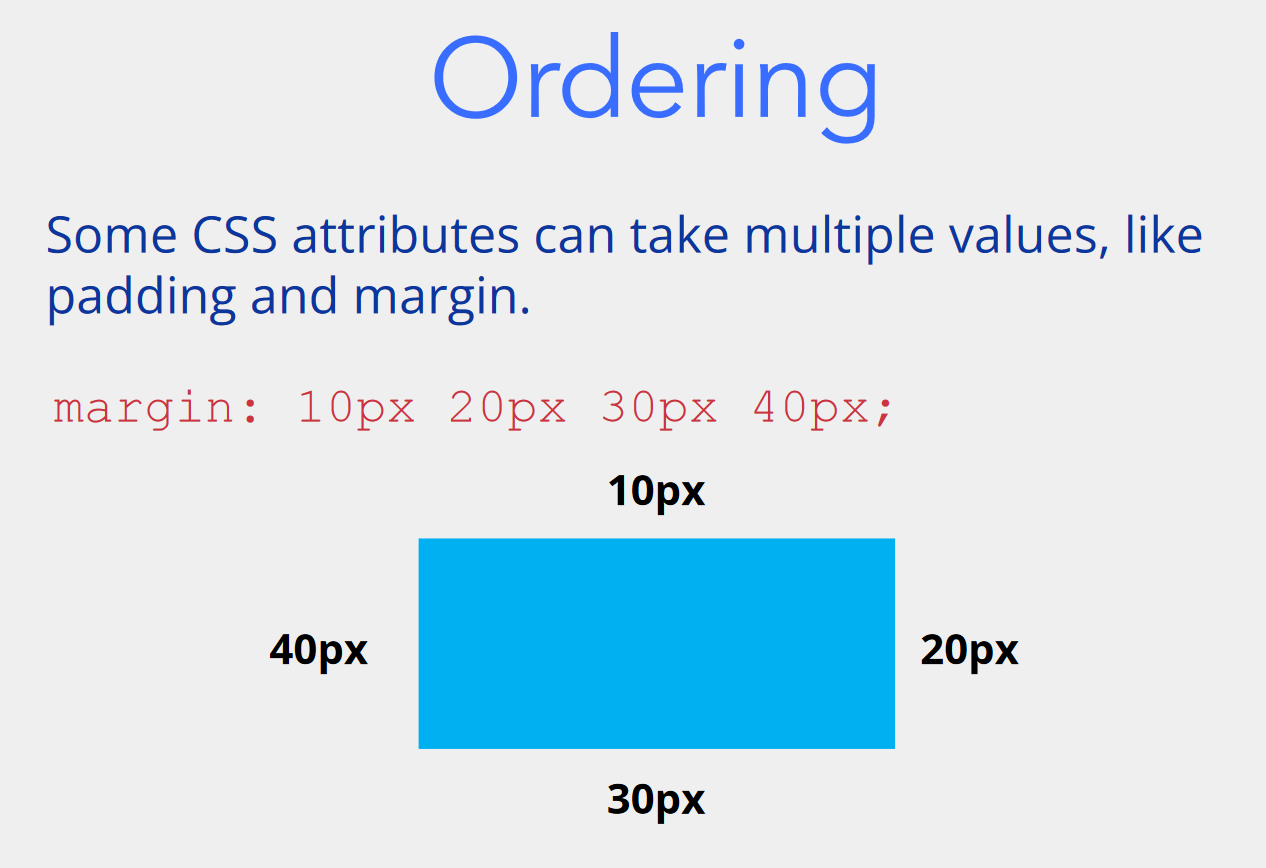
我们需要注意的是,他们的值是从顶部开始,顺时针方向赋值的
image-20241127154717341


6. Flex布局

image-20241127154820702

image-20241127154834368

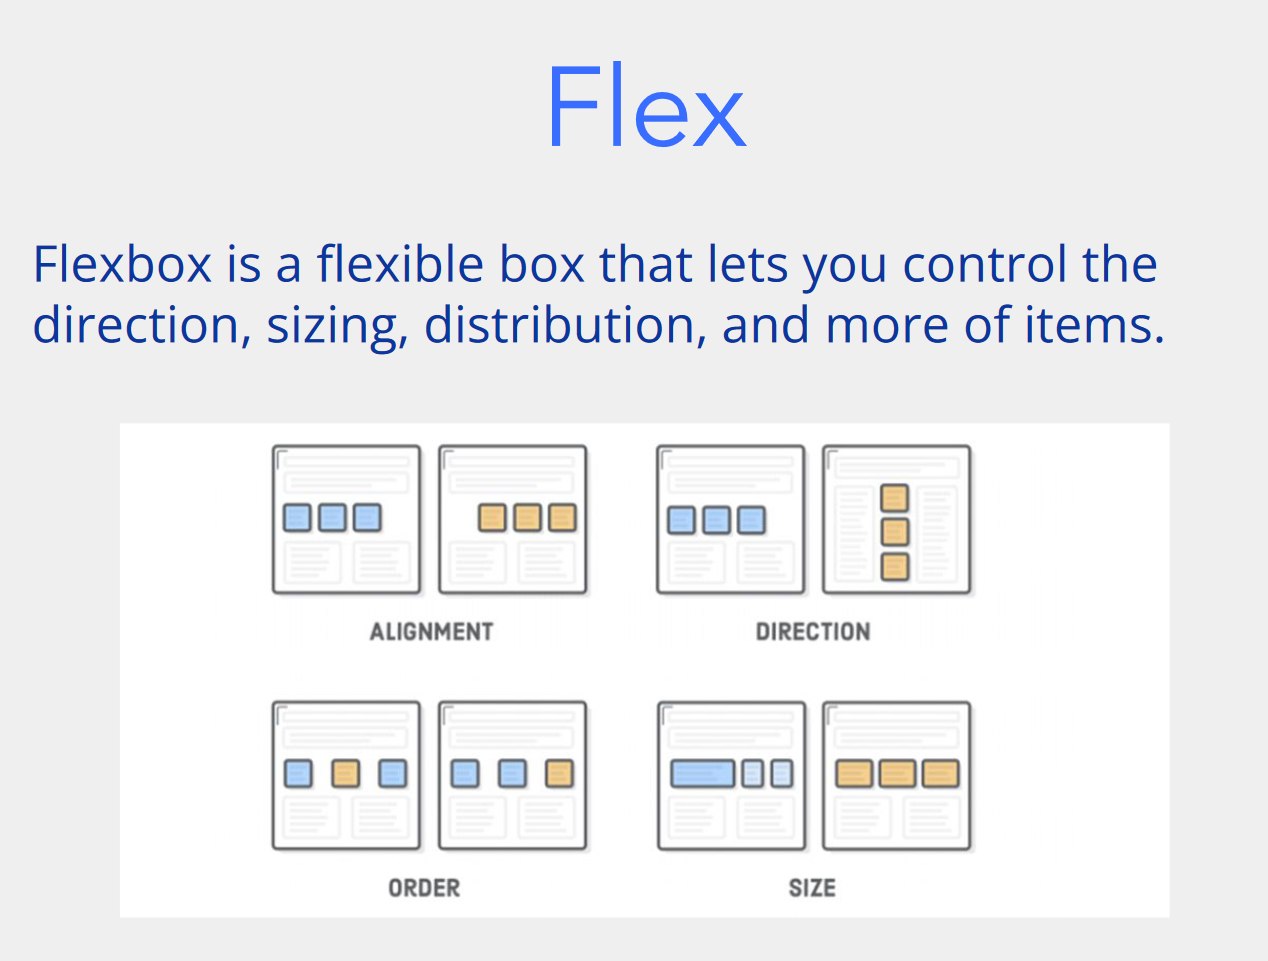
好的,下面是 Flex布局中常用的属性以及它们的简要介绍,并附上相应的示例:

1. Flex容器的常用属性

1.1 display: flex

这个属性是启用 Flex 布局的关键,它使得元素成为 Flex 容器,容器中的直接子元素会自动成为 Flex 项。

1
2
3
.container {
display: flex; /* 启用 Flex 布局 */
}

1.2 flex-direction

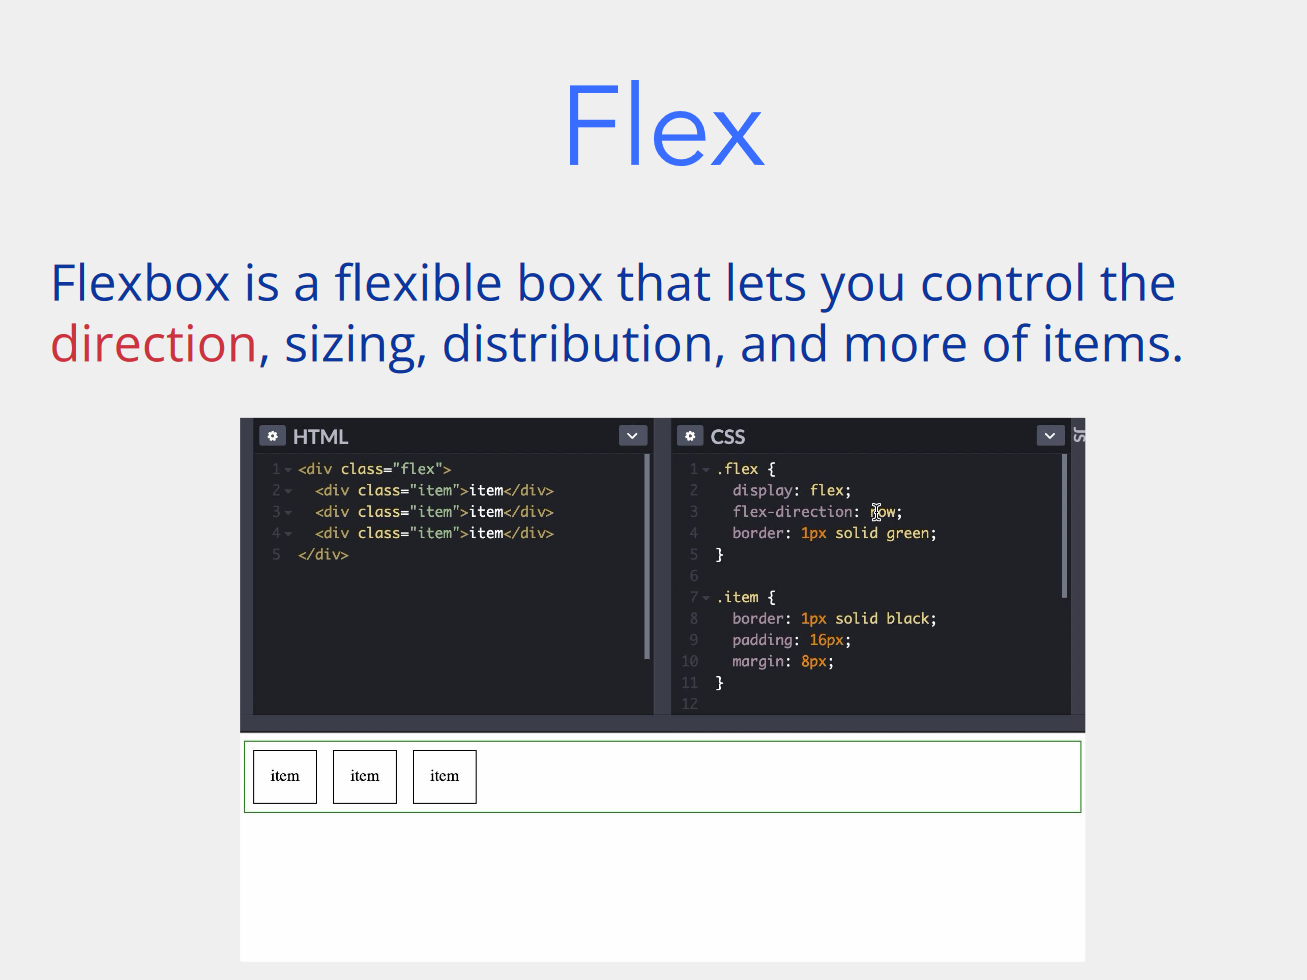
flex-direction 控制 Flex 项在容器中的排列方向。

  • row:默认值,主轴为水平方向,子项从左到右排列。
  • row-reverse:子项从右到左排列。
  • column:主轴为垂直方向,子项从上到下排列。
  • column-reverse:子项从下到上排列。
1
2
3
4
.container {
display: flex;
flex-direction: row; /* 子项水平方向排列(默认) */
}

1.3 flex-wrap

flex-wrap 控制 Flex 项是否换行。

  • nowrap:默认值,不换行,所有项会在一行内显示。
  • wrap:当一行容纳不下时,自动换行。
  • wrap-reverse:换行,但新行的位置在上方。
1
2
3
4
.container {
display: flex;
flex-wrap: wrap; /* 自动换行 */
}

1.4 justify-content

justify-content 控制主轴(默认水平轴)上项的对齐方式。

  • flex-start:将所有项对齐到主轴的起点(默认)。
  • flex-end:将所有项对齐到主轴的终点。
  • center:将所有项对齐到主轴的中心。
  • space-between:项之间分配相等的空间,首尾项紧贴容器边缘。
  • space-around:项之间分配相等的空间,首尾项两端有空隙。
1
2
3
4
.container {
display: flex;
justify-content: center; /* 子项水平居中 */
}

1.5 align-items

align-items 控制交叉轴(默认垂直轴)上项的对齐方式。

  • flex-start:将所有项对齐到交叉轴的起点。
  • flex-end:将所有项对齐到交叉轴的终点。
  • center:将所有项对齐到交叉轴的中心。
  • baseline:将所有项沿基线对齐。
  • stretch:默认值,让项拉伸填充交叉轴(一般用于高度)。
1
2
3
4
.container {
display: flex;
align-items: center; /* 子项垂直居中 */
}

1.6 align-content

align-content 控制多行的对齐方式。与 align-items 不同,align-content 只在有多行时有效。

  • flex-start:将所有行对齐到交叉轴的起点。
  • flex-end:将所有行对齐到交叉轴的终点。
  • center:将所有行对齐到交叉轴的中心。
  • space-between:在行之间分配相等的空间。
  • space-around:在行之间分配相等的空间。
  • stretch:让所有行占满容器的交叉轴。
1
2
3
4
5
.container {
display: flex;
flex-wrap: wrap; /* 多行显示 */
align-content: space-between; /* 行之间分配空间 */
}

2. Flex项的常用属性

2.1 flex-grow

flex-grow 定义了 Flex 项在容器中剩余空间的分配比例,默认值为 0,表示不放大。

1
2
3
.item {
flex-grow: 1; /* 平分剩余空间 */
}

2.2 flex-shrink

flex-shrink 定义了 Flex 项在空间不足时的缩小比例,默认值为 1,表示会缩小。

1
2
3
.item {
flex-shrink: 1; /* 会缩小以适应容器 */
}

2.3 flex-basis

flex-basis 定义了 Flex 项的初始大小。可以是像素、百分比等。它会在 flex-growflex-shrink 之前应用。

1
2
3
.item {
flex-basis: 200px; /* 设置初始宽度为200px */
}

2.4 flex

flexflex-growflex-shrinkflex-basis 的简写,可以同时设置这三个属性。例如,flex: 1 等价于 flex-grow: 1; flex-shrink: 1; flex-basis: 0

1
2
3
.item {
flex: 1; /* 平分剩余空间,并且项的初始宽度为0 */
}

2.5 order

order 属性定义了 Flex 项的排列顺序,默认值是 0,数值越小的项排在前面。通过 order 可以改变元素的顺序,而不影响它们在HTML中的顺序。

1
2
3
.item {
order: 2; /* 设置该项为第三个 */
}

实现水平排列和等分宽度

通过 .u-flex.subContainer 实现子元素的水平排列:

1
2
3
4
5
6
7
8
.u-flex {
display: flex;
}

.subContainer {
flex-grow: 1;
flex-basis: 0;
}
  • flex-grow: 1; 使所有子容器按比例均分剩余空间。
  • flex-basis: 0; 确保每个子容器初始宽度为0,从而达到等分布局。

添加间距

使用相邻兄弟选择器为子容器之间添加间距:

1
2
3
.subContainer + .subContainer {
margin-left: var(--m);
}
  • + 选择器仅作用于相邻的 .subContainer,实现精确控制。

结语

通过这篇博客,我们探索了如何使用HTML和CSS构建一个简单的猫咪主页。从位置设置、图片裁剪到字体管理,以及使用 :root 和 Flex 布局实现高效、现代的设计。